Open topic with navigation
HOW TO - Deploy a Kourier Suitcase
Deploying for the First Time from Development to Production Environments
In this scenario, you are implementing a new integration from your development environment into your production environment(s). The integration does not yet exist in production.
- From your Development connection in Kourier, go to the Administration menu and choose the Pack Suitcase option to create a suitcase for your integration.
- Name your suitcase IntegrationName_mmddyy (where IntegrationName is your integration, such as ECL3, and mmddyy is today’s date).
- Choose your integration from the list.
- Do not check the Include Control Items checkbox.
- Save the suitcase to the Suitcases folder, which is in the same folder structure with the Packages, Inbox, and Logs folders.
- From your Production connection in Kourier, go to the Administration menu and choose the Unpack Suitcase option to install the items for your integration.
- Click on the Choose File button. Navigate to the Suitcases folder where the suitcase was saved, and select your suitcase.
- The Kourier screen will populate with all the items from the suitcase. Since this is the first deployment to production for this Integration, leave everything checked.
- Note that the Compare column of the listing should show New for all items.
- Click the Unpack button. The following dialog box will display:
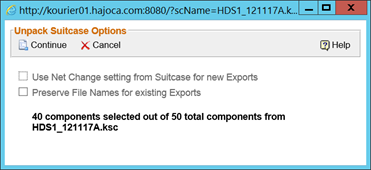
- If you check the first check box, the unpacking process uses the Net Change settings from the exports in the suitcase. If you have set up net change for the exports in your development environment, and you wish to also have net change in production, then check that box. This decision is dependent on how ready you think your exports are to start producing data immediately. If, for instance, your production environment has a lot more data than your development environment, you may want to run full refreshes on your integration’s exports to discover data errors that might not have shown up in the development environment. You also might not be ready to set up schedules, in which case you don’t want net change to accumulate without being relieved.
- The second check box is not needed for the first time you deploy an integration. It only refers to exports that already exist in the environment you are unpacking in, and no exports are going to previously exist the first time you deploy.
- Click Continue and the suitcase will be unpacked.
- If you have an integration property that is dependent on your environment (for instance, the SITE_ID property), go into the Integrations option in the Define menu, choose your integration, and change the property value to the appropriate value. Don’t forget to save your change.
- Create your SQL tables. The easiest way to do this is to go into each new service you are implementing from your suitcase and click on the DDL button. When the SQL statement is displayed in SQL Management Studio, Kourier will default the last database used for the USE clause it adds at the beginning of each CREATE statement. So you will have to change all references of the development database to the production database. The SQL statement editor supports mass changes, so that’s your easiest route.
- Create your packages. Go to the Generate SSIS Packages option under the Design Exports menu. Filter on your Integration ID. All the exports for your integration will display. Click on the Generate Packages button. The following screen will display:
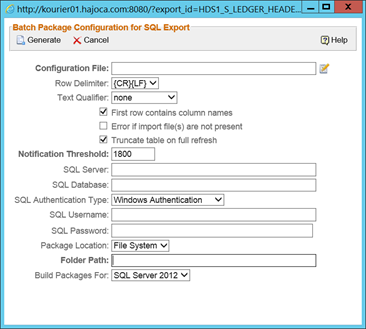
- Some prompts may be filled in depending on the state of the export at the time you packed it into your suitcase. Make sure the following fields are accurate (note, after you fill this information in the first time, you don’t have to do this again because it updates the export with the package information):
- Configuration File folder path and file name
- SQL Server
- SQL Database
- Folder Path should point to your production Packages folder path.
- Click on the edit button for the Configuration File, after you fill in the path and file name. Kourier will display the following configuration screen:
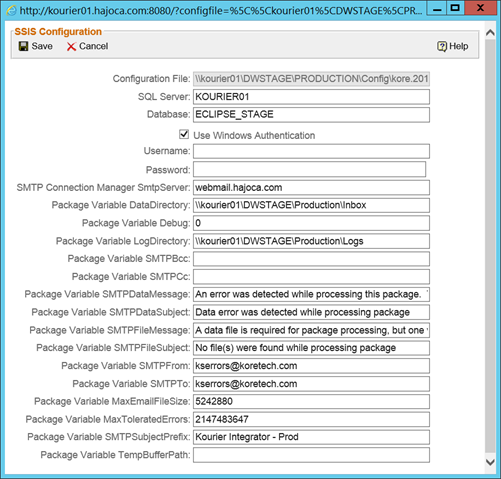
- Make sure sure the following fields are accurate, click the Save button to save your changes, then click Cancel to dismiss the screen.
- SQL Server should be your production server.
- Database should be your production database.
- Package Variable DataDirectory should point to your production Inbox folder path.
- Package Variable LogDirectory should point to your production Logs folder path.
- Back on the Batch Package Configuration screen, click on Generate. Packages will generate for all your checked exports.
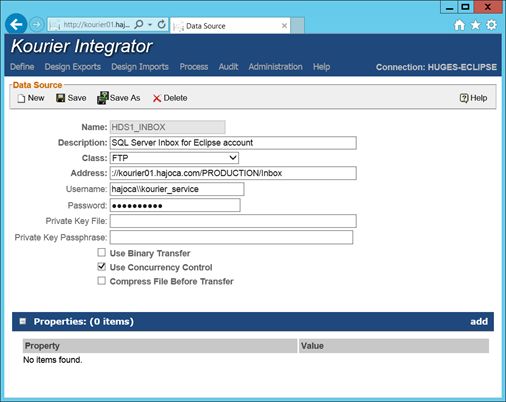
- Go to Data Sources under the Define menu and select your Integration’s Inbox DSN. Change the configuration to point to the correct Inbox, with the correct FTP credentials.
- If Net Change was not inherited from the development suitcase (see step 4 above), turn Net Change on for all your exports. This must be done in each export, one at a time. If you wish to run full refreshes first, and resolve any data errors before turning on Net Change, this step can be done later.
- Run full refreshes for all the implemented services. There are two ways to go about this.
- Create a schedule and add all the services to the schedule. Manually run the schedule in Full Refresh mode.
- Manually run each service separately in Full Refresh mode.
- If you have data errors, resolve them and re-run the Full Refresh.
- If you have multiple production environments, see below – Deploying to other Production Environments.
Deploying to other Production Environments
In this scenario, you have deployed to your first production environment, but you have several other production environments to deploy to also.
- Create a suitcase from the first production environment, using the same method as previous. When naming the suitcase, use this naming convention: IntegrationName_PROD_mmddyy (where IntegrationName is your integration, such as ECL3, and mmddyy is today’s date). Adding PROD to the name will differentiate between the one created from your development environment, and will also allow you to easily identify a suitcase created from your production environment.
- From your next production environment connection, unpack the suitcase using the same method as previous. If you want to inherit the Net Change settings from your production suitcase, be sure to click on the check box labeled Use Net Change setting from Suitcase for new Exports. As before, the second check box labeled Preserve File Names for existing Exports does not need to be checked.
- If you have an integration property that is dependent on your environment (for instance, the SITE_ID property), go into the Integrations option in the Define menu, choose your integration, and change the property value to the appropriate value. Don’t forget to save your change.
- Since you are moving from production to production, you won’t need to change anything in your Inbox DSN, but it is always a good idea to double-check the FTP address to make sure it is correct.
- Assuming the other production environments are using the same SQL database as your first production environment, you will not have to create new SQL tables.
- Generate your packages using the same method as previous. When you click on Generate Packages and the Package Configuration screen displays, enter the same configuration file folder path and file name as your first production environment. Answer all the prompts as you did the first production environment. There is no need to click on the editor button to edit the SSIS Configuration information. This will be constant from the first production environment. Packages will be built in the same folder as the first production environment, but the real reason to execute this step is to properly update the exports that exist locally in each production environment with all the package related information.
- Run full refreshes for all the implemented services, using the previous method.
Deploying to Production Environments for Updates to the Integration
In this scenario, you have already implemented your integration, but you have fixed, enhanced or added to it.
- Create a suitcase using previous method. Name your suitcase IntegrationName_UPD_mmddyy (where IntegrationName is your integration, such as ECL3, and mmddyy is today’s date). Adding UPD to the name will differentiate the suitcase from other suitcases, and allow you to tell at a glance that it’s an update to a previous development suitcase. Typically you will have made your changes and updates in your development environment, so this step will be done from the development environment as well.
- From your Production connection in Kourier, unpack the suitcase using the same method as previous. When the Kourier screen populates with all the items from the suitcase, note that the Compare column will display with Different or New for items that you changed or added to the integration. These will also be checked. Anything that is displayed as Equal will not be checked. If you want to implement other items not checked, this is your opportunity to do that. You will want to make sure NOT to include the Inbox DSN from the suitcase, to preserve the production connection information.
- When the Unpack Suitcase Options dialog box displays, as before, your decision to check the first checkbox (Use Net Change setting from Suitcase for new Exports) is dependent on whether you set up net change in your Development environment. You should check the second box (Preserve File Names for existing Exports). This will ensure that the background fields on the existing exports in your current production environment will not get overwritten by the exports from the development environment. At the end of this section is a list of the fields on the exports that will not be overwritten if you check the second box.
- If you have new exports, create your SQL tables using previous method. Kourier should remember your current production database and the correct USE clause will be added to the DDL statement.
- Create your packages. Go to the Generate SSIS Packages option under the Design Exports menu. As before, filter on your integration. Any exports that are different will be checked in the list. When you click on Generate Packages and the Package Configuration screen displays, make a quick check to determine that the settings are correct, then click on the Generate button. You should not have to make changes; Kourier will display the correct production settings. However, if the only thing you are implementing in the update are new exports, you may have to be careful of these settings.
- Run full refreshes for all new and changed exports, using previous method.
Fields that are not overwritten on an existing export if Preserve File Names for existing Exports is checked:
- Select File
- Export File
- Net change flag
- Checksum flag
- Net Change File
- Net Change When (When to apply net change)
- Net Change App ID (99% will be export name)
- Notification Threshold (updated when package is created)
- Row Delimiter (updated when package is created)
- Text Qualifier (updated when package is created)
- First Row Column Flag (updated when package is created)
- Import File Not Present Flag (updated when package is created)
- SQL Server (updated when package is created)
- SQL Authorization Type (updated when package is created)
- SQL User Name (updated when package is created)
- SQL User Password (updated when package is created)
- SQL Database (updated when package is created)
- SQL Table
- SQL Package Name (updated when package is created)
- SQL Package Description (updated when package is created)
- SQL Package Location Type (updated when package is created)
- SQL Package Folder Path (updated when package is created)
- SQL SSIS Configuration File Folder Path (updated when package is created)
- SQL Package Generation Date
- SQL Package Generation Time
- Last Update Date
- Last Update Time
- Truncate Table on Full Refresh Flag (updated when package is created)
Deploying a suitcase for a backup and restore procedure
In this scenario, you create a suitcase specifically for backing up your Kourier work so that you can restore in case of emergency.
- From the connection for the environment you want to create a back-up for, create a suitcase using previous method. Name your suitcase IntegrationName_BAK_mmddyy (where IntegrationName is your integration, such as ECL3, and mmddyy is today’s date). Adding BAK to the name will differentiate the suitcase from other suitcases, and allow you to tell at a glance that it’s a back-up suitcase.
- When creating your back-up suitcase, make sure to check the Include Control Items check-box. This will save any control items into the suitcase as well, so that they can be restored if necessary. These control items include System Literals, Kourier Configurations, Event Filters and SSIS Package Defaults. When performing deployment from Development to Production, you don’t want to include these items because usually Dev and Prod have different information in them. However, when you want to restore, you do want these items in your suitcase in case they are lost or overridden.
-
From the connection for the environment you want restore, unpack the suitcase using the same method as previous. When the Kourier screen populates with all the items from the suitcase, the Compare column will display results depending on the state of the data in your target environment. Items that are missing will display as New. Items that are different from your back-up will display as Different. Items that are the same as your back-up will display as Equal. Anything that is displayed as Equal will not be checked. Since this is a restore from a back-up, make sure to include everything that is Different or New.
Special care should be taken for the Data Source Name items (items in the KT_QUEUES file). These items are not checked by the process if they exist in the target environment, even if they are different. This is because the default behavior of the unpacking tool is to unpack in a production environment where you do not want to overwrite your existing DSN’s from your development environment. However, when you are deploying as a restore from a backup suitcase, you will want to unpack your DSN’s. Ensure they are all checked before you unpack.
- When the Unpack Suitcase Options dialog box displays, you should check the first box (Use Net Change setting from Suitcase for new Exports). This will ensure net change settings for the backed-up exports will be set-up for any exports that are missing in your target restore environment. You should NOT check the second box (Preserve File Names for existing Exports). You want the File Name and other fields (see above list of fields in previous scenario) to be restored from the suitcase for any existing exports in your target restore environment.
- To ensure that net change is fully restored for all exports in your target restore environment, go to TCL and run the command KT.SETUPNETCHG. This will set up net change for any exports where it should be set up but is not.
-
If you go to the Generate SSIS Packages page, you will notice that all of your exports will display as needing to have packages regenerated. This is due to the fact that when you create a suitcase, it clears the Last Date Generated and Last Time Generated fields for each export. It does this because the main usage for suitcases is deploying to production, and you always want to regenerate packages for exports in that scenario. Since you are restoring from a back-up it is not strictly necessary to rebuild packages (the path to the package for the export will be restored), but if you want all the exports to have the Last Generated date and time, you can generate all the packages from the Generate SSIS Packages page.
Related Topics:
Kourier Suitcase Unpack